Insulating Your Basement Ceiling: A Comprehensive Guide
Adequately insulating your basement ceiling is crucial for maintaining a comfortable and energy-efficient home. Insulation helps regulate temperature by preventing heat loss in the winter and keeping the basement cool in the summer. It also reduces noise and moisture issues, creating a more comfortable living space.
There are various types of insulation materials available, each with its own pros and cons. Fiberglass batts and rolls are commonly used due to their affordability and ease of installation. Cellulose insulation is another popular choice, as it is made from recycled paper and is environmentally friendly. Spray foam insulation provides excellent insulation value but is more expensive and requires professional installation.
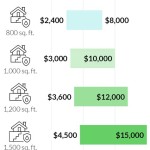
Before you begin installing insulation, it is essential to determine the R-value required for your basement ceiling. R-value measures the material's resistance to heat flow; a higher R-value indicates better insulation. The recommended R-value for basement ceilings varies depending on your region and climate.
Here is a step-by-step guide to help you insulate your basement ceiling:
Materials and Tools You'll Need:
- Insulation material (fiberglass batts, cellulose, spray foam)
- Insulation support system (wires, clips, or framing)
- Vapor barrier (polyethylene sheeting)
- Stapler or tape
- Measuring tape
- Safety glasses
- Dust mask
Step 1: Prepare the Basement Ceiling
Clear the ceiling of any obstacles, such as wires or pipes. Install an insulation support system to support the insulation material. This can be done using wires, clips, or framing.
Step 2: Install the Vapor Barrier
Lay a polyethylene vapor barrier over the insulation support system. The vapor barrier prevents moisture from entering the insulation and causing damage.
Step 3: Install the Insulation
Place the insulation material snugly between the joists of the ceiling. Cut the insulation to fit around any obstacles. If using fiberglass batts or rolls, staple them to the insulation support system. For cellulose insulation, blow it into the space between the joists.
Step 4: Cover the Insulation
Cover the insulation with a second layer of vapor barrier to trap any moisture that may enter the insulation. Staple or tape the vapor barrier in place.
Step 5: Seal any Gaps
Caulk or foam any gaps around the perimeter of the basement ceiling and where the insulation meets obstacles. This will prevent warm air from escaping and cold air from entering.
Tips for Success:
- Wear safety glasses and a dust mask when handling insulation materials.
- Ensure the insulation is installed tightly to prevent air gaps.
- Seal all gaps around the perimeter of the basement ceiling and where the insulation meets obstacles.
- Consider hiring a professional insulation contractor for complex installations or if you have concerns about your health or safety.
Insulating your basement ceiling is a relatively straightforward project that can significantly improve the comfort and energy efficiency of your home. By following these steps, you can ensure a successful installation and enjoy the benefits of a well-insulated basement.

Should I Insulate My Basement Ceiling And Walls Aire Serv

Ceiling Insulation In Your Basement

Insulate A Basement Ceiling With Building Moxie As The Diy Guy

Basement Ceiling Insulation Interior Inspections Internachi Forum

Best Insulation For Basement Ceilings And Why You Need It

What Is Basement Ceiling Insulation And It Worth

How To Insulate Your Basement 2 10 Home Buyers Warranty

What To Know About Soundproofing A Basement Ceiling

How To Soundproof A Basement Ceiling

How To Complete A Diy Basement Walls And Ceiling Insulation Project
See Also