How to Install Vapor Barrier in Basement
Vapor barriers are an essential part of any basement waterproofing system, and they are a relatively easy and inexpensive way to help protect your home from moisture damage. By preventing water vapor from entering your basement, a vapor barrier can help to prevent mold, mildew, and other moisture-related problems.
There are a few different types of vapor barriers available, but the most common type is a polyethylene sheet. Polyethylene is a waterproof and vapor-proof material, and it is available in a variety of thicknesses. The thicker the polyethylene, the more effective it will be at preventing vapor transmission.
Installing a vapor barrier in your basement is a straightforward process, but there are a few things you need to do before you get started.
- Clean the basement floor and walls thoroughly. Remove any dirt, dust, or debris that could prevent the vapor barrier from adhering properly.
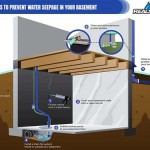
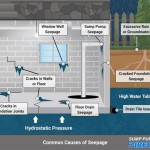
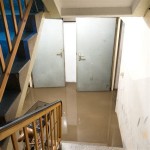
- Install any necessary drainage systems. If your basement is prone to flooding, you will need to install a drainage system to remove excess water. This could include a sump pump, a French drain, or a perimeter drain.
- Allow the basement to dry completely. Once you have installed any necessary drainage systems, allow the basement to dry completely before installing the vapor barrier.
Once you have prepared the basement, you can begin installing the vapor barrier.
- Start by laying out the polyethylene sheet on the basement floor. Overlap the edges of the sheet by at least 6 inches.
- Use duct tape to seal the seams between the sheets of polyethylene.
- Continue laying out the polyethylene sheet until the entire floor is covered.
- Once the floor is covered, you can begin installing the vapor barrier on the walls.
- Start by cutting the polyethylene sheet to fit the walls. Overlap the edges of the sheet by at least 6 inches.
- Use duct tape to seal the seams between the sheets of polyethylene.
- Continue installing the vapor barrier on the walls until all of the walls are covered.
- Once the vapor barrier is installed, you can begin installing the finished flooring or wall covering.
Installing a vapor barrier in your basement is a simple and effective way to protect your home from moisture damage. By following these steps, you can ensure that your vapor barrier is installed properly and that it will provide years of protection for your home.

How To Install A Basement Vapor Barrier Hgtv

No Vapor Retarders On Interior Side Of Air Permeable Foundation Insulation Building America Solution Center

Do I Need A Vapor Barrier In My Basement Epp Foundation Repair

How Should I Finish An Existing Basement Wall Jlc Online

How To Install Vapor Barrier In Basement Storables

Be Sure To Use A Moisture Barrier When Building Out Your Basement

Understanding Vapor Barriers The Green Cocoon

Fixing Moldy Basements Vapor Barriers Can Be A Bad Idea

Davenport Thermaldry Vapor Barrier Midamerica Basement Systems

How Can You Check Your Basement Vapor Barrier Foundation Repair Of Western Colorado
See Also