How To Install A Sump In Basement
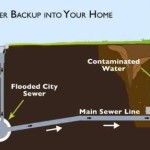
A sump pump is a crucial component for any homeowner with a basement, especially in areas prone to flooding. It is a device that helps remove excess water from the basement, preventing damage to your property and belongings. Installing a sump pump can be a challenging task, but it's essential for protecting your basement from water damage. Here's a step-by-step guide on how to install a sump pump in your basement:
Step 1: Choose the Right Sump Pump
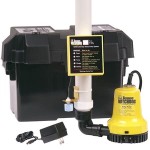
The first step is to determine the best sump pump for your basement. There are various types of sump pumps available, each with its own advantages and disadvantages. When selecting a sump pump, consider the size of your basement, the amount of water you typically experience, and the power source available. Submersible sump pumps are the most common type used in basements, as they are compact and can be placed directly in the sump basin.
Step 2: Determine the Location of the Sump Basin
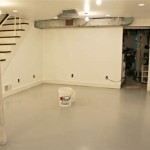
The next step is to determine the optimal location for the sump basin. The sump basin is a pit dug in the basement floor where the sump pump will be placed. It should be positioned in an area of the basement that is prone to flooding or water accumulation. Mark the location of the sump basin on the floor and ensure it is at least 2 feet away from the basement walls.
Step 3: Dig the Sump Basin
Using a shovel or a digging bar, dig a hole in the basement floor for the sump basin. The hole should be approximately 2 feet deep and wide enough to accommodate the sump pump and its float switch. If you encounter any water during the digging process, use a wet/dry vacuum to remove it.
Step 4: Install the Sump Basin
Place the sump basin in the hole and ensure it is level. Backfill the area around the sump basin with gravel or crushed stone to help prevent water from seeping into the basin. Compact the gravel or crushed stone firmly around the basin.
Step 5: Install the Sump Pump
Next, install the sump pump inside the sump basin. Submersible sump pumps are typically placed directly in the water, while pedestal sump pumps are mounted on a pedestal above the water level. Follow the manufacturer's instructions for proper installation and connection of the sump pump.
Step 6: Connect the Discharge Pipe
Attach a discharge pipe to the outlet of the sump pump. The discharge pipe should be at least 1-1/2 inches in diameter and should be directed away from the house. The pipe can be made of PVC, polyethylene, or cast iron. Run the discharge pipe out of the basement and connect it to an appropriate drainage system.
Step 7: Connect the Power Supply
Connect the sump pump to a dedicated electrical outlet. The outlet should be equipped with a ground fault circuit interrupter (GFCI) for safety. Hire a qualified electrician to ensure the electrical connections are made correctly.
Step 8: Test the Sump Pump
Once the sump pump is installed, test it to ensure it is working properly. Pour water into the sump basin and check if the pump turns on and pumps the water out. If the pump does not turn on, check the electrical connections and the float switch. Make any necessary adjustments until the sump pump operates correctly.
Additional Tips:
Consider installing a battery backup system for the sump pump in case of a power outage.
Clean the sump pump regularly to remove any debris or sediment that may accumulate and affect its performance.
Inspect the sump pump and the discharge pipe annually to ensure they are in good condition and free of any blockages.

Diy Sump Pump Install Your Own Smd Fluid Controls

What You Should Know About Sump Pumps Dry Basement

Diy Sump Pump Install Your Own Smd Fluid Controls

Permanent Fixes For Damp Basements Diy

Tips For Installing Sump Pumps 2024 10 17 Plumbing And Mechanical

Basement Sump Pump Installation Charlotte Nc

Sump Pump Installation How To Install A Homeserve Usa

Basement Sump Pump Installation 101 Kc Waterproofing

How To Install A Sump Pump

Installing A Sump Pump In Our Basement Youtube
See Also