How to Drywall a Basement: A Step-by-Step Guide to Achieving a Professional Finish
Transforming an unfinished basement into a comfortable and functional living space often involves drywall installation. Drywall, also known as gypsum board, serves as the foundation for walls and ceilings, providing a smooth surface for paint, wallpaper, or other finishes. Here's a comprehensive guide to help you master the art of drywalling a basement:
Materials You'll Need:
Before you begin, gather the necessary materials:
- Drywall
- Drywall screws
- Drywall tape
- Joint compound
- Putty knife
- Screwdriver or drill
- Level
- Chalk line
- Measuring tape
Step 1: Prepare the Basement
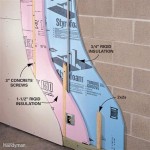
Ensure the basement is dry and well-ventilated. If there are any leaks or moisture issues, address them first to prevent damage to the drywall.
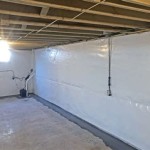
Step 2: Install the Framing
Metal studs or wooden studs form the framework for your walls and ceilings. Space the studs 16 inches apart, ensuring they are straight and level.
Step 3: Hang the Drywall
Using a drywall saw or utility knife, cut the drywall panels to fit between the studs. Lift the sheets onto the framing and secure them with drywall screws. Countersink the screws slightly below the surface.
Step 4: Tape the Joints
Apply drywall tape over all joints where the panels meet. Smooth it out using a putty knife and then apply a thin layer of joint compound.
Step 5: Mud and Sand
Apply a second coat of joint compound over the taped joints and let it dry. Once dry, sand the surface until it is smooth. Repeat this process until all joints are seamless.
Step 6: Apply Finishing Compound
Using a wide putty knife, spread a thin layer of finishing compound over the entire drywall surface. This will create a smoother finish for painting or other decorative treatments.
Step 7: Sand and Prime
After the finishing compound has dried, sand it smooth and remove any debris. Apply a coat of primer to the drywall to prepare it for paint or finishing.
Tips for Success:
Follow these tips for a professional-looking result:
- Use a level to ensure the studs and drywall are straight and level.
- Pre-drill holes for the drywall screws to prevent splitting.
- Apply thin coats of joint compound and allow each coat to dry completely before sanding.
- Sand with a fine-grit sandpaper for a smooth finish.
- Use a damp sponge to clean any drywall dust before painting.

Beginners Guide To Installing Basement Drywall Semigloss Design

Beginners Guide To Installing Basement Drywall Semigloss Design

How To Drywall A Basement Ceiling Toronto Painters

Beginners Guide To Installing Basement Drywall Semigloss Design

6 Finishing Basement Drywall Installation Youtube

Don T Test Your Luck With Drywall Why Our Waterproofed Basement Walls Are The Way To Go News And Events For Total Finishing

Basement Drywall How To Properly A

How Much Does It Cost To Drywall A Basement Real Estimate Services

Basement Remodel Day 4 Hanging Taping Mudding Drywall

Is Drywall Ceiling In A Basement Any Good Remodeling Journey
See Also