Basement Bathroom Rough In Plumbing
Rough plumbing for a basement bathroom involves installing the essential plumbing components, including water supply lines, drain lines, and fixtures. This process is crucial in ensuring the proper functionality and longevity of your basement bathroom.
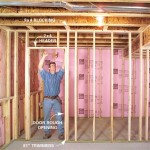
Planning and Preparation
Before roughing in plumbing, it is vital to determine the layout of your bathroom, including the location of the toilet, sink, shower/tub, and any additional fixtures. This will help you plan the placement of the plumbing components and ensure efficient and accessible use of your bathroom.
Water Supply
The first step is to install the water supply lines. These lines bring cold and hot water to your fixtures. Use PEX (Cross-Linked Polyethylene) tubing or copper pipes for the water supply lines. Connect the lines to the main water supply, ensuring proper pressure and flow rate.
Drain Lines
Drain lines carry wastewater away from your fixtures. Install PVC (Polyvinyl Chloride) pipes or cast iron pipes for the drain lines. Ensure that the pipes have proper slope to allow gravity to efficiently drain water. Connect the drain lines to the main sewer line, ensuring proper drainage and preventing backups.
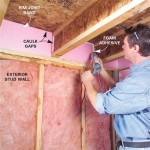
Vent Stack
A vent stack is a vertical pipe that extends through the roof of your house. It allows air to enter the plumbing system, preventing the development of negative pressure that could hinder drainage. Install a vent stack in the basement bathroom and connect all the drain lines to it.
Fixtures
Once the water supply and drain lines are installed, you can rough in the fixtures. This involves connecting the toilet, sink, shower/tub, and any other fixtures to the plumbing components. For the toilet, install a flange on the floor and connect the toilet's drain line to it. For the sink, install a drain with a pop-up assembly and connect the water supply lines to the faucets.
Testing and Inspection
After roughing in the plumbing, it is essential to test the system for leaks. Turn on the water supply and check for any drips or leaks in the connections. If any leaks are found, tighten the fittings or replace the components as necessary. Once the system is leak-free, call a licensed plumber for a final inspection to ensure compliance with building codes and regulations.

Plumbing Basement Rough In Identification Home Improvement Stack Exchange

Basement Bathroom Rough In Diy Home Improvement Forum

Basement Bathroom Roughin Drain And Venting2 Youtube

How To Rough Plumb A Basement Bathroom With S Wikihow Life

Basement Rough In Walk Through Youtube

Bathroom Plumbing Diagram

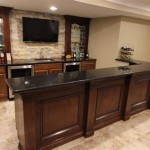
Basement Bathroom Rough In Plumbing Tour

Plumbing Deciphering Basement Bathroom Rough In Home Improvement Stack Exchange

Rough Plumbing In Basement

Basement Bathroom Rough In Diy Home Improvement Forum
See Also