Building A Wall in a Basement
Building a wall in a basement can be a daunting task, but it's definitely doable with the right tools and materials. Here's a step-by-step guide to help you get the job done right.
Step 1: Plan Your Wall
The first step is to plan your wall. This includes determining the size, location, and framing of your wall. You'll also need to decide what materials you're going to use.
Step 2: Gather Your Materials
Once you have a plan, you'll need to gather your materials. For a typical basement wall, you'll need the following:
- Framing lumber (2x4s or 2x6s)
- Drywall
- Insulation
- Nails or screws
- Caulk
- Paint or wallpaper
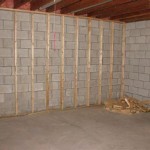
Step 3: Frame Your Wall
The next step is to frame your wall. This involves creating a skeleton for your wall using framing lumber. Start by measuring and cutting the top and bottom plates of your wall. The top plate will be installed on top of the floor joists, and the bottom plate will be installed on the subfloor.
Once you have the top and bottom plates in place, you can start installing the studs. Studs are vertical pieces of framing lumber that are spaced 16 inches apart. Use a level to make sure that the studs are plumb, and then nail or screw them into place.
Step 4: Insulate Your Wall
Once your wall is framed, you'll need to insulate it. Insulation helps to keep the cold air out and the warm air in. There are several different types of insulation available, so choose one that is appropriate for your climate.
To install insulation, simply cut it to size and fit it into the spaces between the studs. Be sure to wear gloves and a dust mask when handling insulation.
Step 5: Drywall Your Wall
The next step is to drywall your wall. Drywall is a type of wallboard that is made of gypsum plaster and paper. It's a great choice for basements because it's fire-resistant and moisture-resistant.
To install drywall, simply measure and cut it to size. Then, apply a thin layer of joint compound to the edges of the drywall and press it into place on the wall. Use a level to make sure that the drywall is flat, and then nail or screw it into place.
Step 6: Finish Your Wall
The final step is to finish your wall. This involves taping and mudding the joints between the drywall panels, and then painting or wallpapering the wall.
To tape and mud the joints, simply apply a thin layer of joint compound to the joint and then press a piece of drywall tape over it. Smooth out the joint compound with a putty knife.
Once the joints are taped and mudded, you can paint or wallpaper the wall. Be sure to use a paint or wallpaper that is appropriate for basements.

Framing Basement Walls How To Build Floating

Basement Framing How To Frame Your Unfinished

Tips For Framing Basement Walls Semigloss Design

Basement Framing How To Frame Your Unfinished

Insulating And Framing A Basement

This Is How To Frame A Basement According Mike Holmes Hgtv

How To Frame A Basement Wall

Finishing A Basement Part 5d Building Walls Setting Plumbing

Home Stay A New Room Terrific Broth

How To Finish A Basement Wall My Foundation Repairs
See Also