Do It Yourself Basement Framing
Finishing a basement can be a great way to add extra living space to your home, but it can also be a daunting task. One of the most important steps in finishing a basement is framing the walls, and this can be a difficult job if you've never done it before. However, with a little planning and preparation, you can frame your basement walls yourself and save a lot of money in the process.
Materials You'll Need
Before you start framing your basement walls, you'll need to gather all of the necessary materials. These include:
- 2x4 studs
- Top and bottom plates
- Corner studs
- Toe-nailing plates
- Framing nails
- Hammer or nail gun
- Level
- Chalk line
Layout the Walls
The first step in framing your basement walls is to layout the walls. To do this, you'll need to measure the length and width of the basement and mark the location of the walls on the floor. Once you have the walls laid out, you can start framing them.
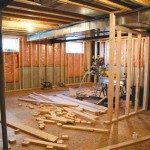
Frame the Walls
To frame the walls, you'll need to cut the studs and plates to the correct length. The studs should be 16 inches on center, and the top and bottom plates should be flush with the floor and ceiling. Once you have the studs and plates cut, you can assemble the walls. To do this, you'll need to nail the studs to the top and bottom plates. You can use a hammer or a nail gun to do this.
Install the Corner Studs
Once the walls are assembled, you'll need to install the corner studs. The corner studs are what hold the walls together, so it's important to make sure they're installed correctly. To install the corner studs, you'll need to cut them to the correct length and nail them to the walls. You can use a level to make sure the corner studs are plumb.
Install the Toe-Nailing Plates
The toe-nailing plates are what hold the walls to the floor and ceiling. To install the toe-nailing plates, you'll need to cut them to the correct length and nail them to the walls and the floor or ceiling. You can use a hammer or a nail gun to do this.
Finishing Up
Once the walls are framed, you'll need to finish them up. This includes installing drywall, painting, and adding trim. You can also add insulation to the walls to help keep your basement warm in the winter and cool in the summer.
Tips for Framing Basement Walls
Here are a few tips for framing basement walls:
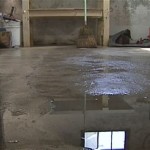
- Make sure the floor is level before you start framing the walls.
- Use a level to make sure the walls are plumb.
- Nail the studs to the top and bottom plates securely.
- Install the corner studs correctly.
- Install the toe-nailing plates securely.
- Finish the walls by installing drywall, painting, and adding trim.
Framing basement walls can be a difficult job, but it's a job that can be done by do-it-yourselfers. By following these tips, you can frame your basement walls yourself and save a lot of money in the process.

Basement Framing How To Frame Your Unfinished

Insulating And Framing A Basement

This Is How To Frame A Basement According Mike Holmes Hgtv

Basement Framing How To Frame Your Unfinished

How To Frame A Basement Yourself Complete Guide

Tips For Framing An Unfinished Basement Week 2 Of The One Room Challenge Willow Bloom Home

Diy How To Frame Your Basement A Z

How To Finish A Basement Diy

Framing D I Y Basement Finishing Blog

Framing Basement Walls How To Build Floating
See Also