Framing a Basement Wall Against Concrete: Essential Aspects
Transforming a concrete basement into a usable living space requires a well-supported framework. Framing a basement wall against concrete is a crucial step in this process, ensuring a structurally sound and durable foundation for your new room.
Preparation:
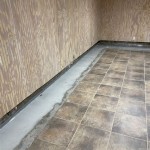
Before commencing with framing, meticulous preparation is indispensable. Inspect the concrete walls for any irregularities or protrusions that may hinder the framing process. Remove any debris, dirt, or efflorescence to create a clean and level surface for the framing to adhere to.
Insulation:
Installing insulation between the concrete wall and the framing is essential for regulating temperature and preventing moisture buildup. Use rigid foam insulation boards or spray foam insulation to create a thermal barrier, reducing heat loss and condensation.
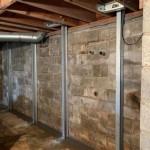
Studs and Plates:
The framework consists of studs (vertical members) and plates (horizontal members). Select studs with a thickness appropriate for the desired wall height and load-bearing capacity. Position the studs against the concrete wall, ensuring they are plumb and level. Attach the studs to the concrete using concrete anchors or specialized fasteners designed for concrete surfaces.
Bottom and Top Plates:
Secure the bottom and top plates to the studs using construction screws or nails. The bottom plate rests on the floor, while the top plate supports the ceiling joists. Ensure that the plates are level and aligned with the studs.
Framing Techniques:
When framing the wall, use techniques that enhance its structural integrity. Stagger the studs to prevent any weakness or potential buckling. Cut the studs precisely to fit between the plates and avoid gaps or irregularities. Use metal framing connectors or hurricane ties to reinforce the joints between the studs and plates.
Electrical and Plumbing:
If electrical or plumbing installations are necessary, plan and execute them concurrently with framing. Drill holes through the studs and plates to accommodate wires or pipes, ensuring that they do not compromise the structural integrity of the framing.
Drywall and Finishing:
Once the framing is complete, you can install drywall or other wall coverings. Hang the drywall on the studs, ensuring that the seams are staggered and properly taped and mudded. Finish the walls with paint, wallpaper, or other decorative treatments to create a seamless and aesthetically pleasing space.
Tips for Success:

Framing Basement Walls Against Concrete A Step By Guide Validhouse

This Is How To Frame A Basement According Mike Holmes Hgtv

Tips For Framing Basement Walls Semigloss Design

Insulating And Framing A Basement

How To Frame Unfinished Basement Walls Family Handyman

Basement Framing How To Frame Your Unfinished

Tips For Framing Basement Walls Semigloss Design

Basement Framing How To Frame Your Unfinished

Frame Against Cement Framing A Basement Walls Remodel Diy

Framing Basement Walls How To Build Floating
See Also