How to Frame an Unfinished Basement: A Complete Guide
Transforming an unfinished basement into a usable and inviting space can significantly increase your home's value and square footage. Framing is a crucial step in this process, providing a sturdy framework for walls, ceilings, and other structural elements. Here's a detailed guide to help you frame your unfinished basement like a pro.
1. Layout and Measurements
Begin by carefully measuring the basement and creating a floor plan. Mark the location of walls, openings for doors and windows, and any other desired features. Ensure accurate measurements to avoid any costly mistakes later.
2. Framing Material: Selecting and Preparing
Most basements are framed using 2x4 or 2x6 lumber. Choose treated lumber if the basement is prone to moisture. Cut the lumber to the appropriate lengths based on your floor plan.
3. Wall Framing: Building the Perimeter
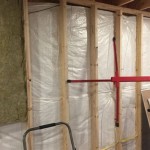
Install bottom plates on the floor, representing the base of your walls. Position the studs upright, typically 16 inches on center, and attach them to the bottom plates using nails or screws. Top the studs with top plates to complete the wall framework.
4. Ceiling Joists: Supporting the Above
Install ceiling joists perpendicular to the wall studs, typically 16 or 24 inches on center. The joist size depends on the span and load they will bear. Secure them to the top plates of the walls and provide additional support with joist hangers.
5. Header Installation: Creating Openings
For door and window openings, you'll need to install headers to support the load above. Headers are typically made of double or triple 2x4s or 2x6s sandwiched together. They span the opening and rest on the studs on either side.
6. Sheathing and Insulation: Adding Layers
Cover the walls and ceiling with sheathing, such as plywood or OSB, to create a stable surface for drywall and other finishes. Install insulation between the studs and joists to improve energy efficiency and soundproofing.
7. Rough Electrical and Plumbing: Preparing for Utilities
Before drywalling, have an electrician and plumber run wires and pipes for electrical outlets, lighting, and plumbing fixtures. This ensures all utilities are in place before the walls are closed up.
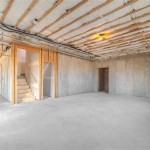
8. Finishing Touches: Drywall, Paint, and Trim
Once the framing and utilities are complete, you can install drywall on the walls and ceiling. Apply paint or other finishes to create the desired aesthetic. Add trim, such as baseboards, door casing, and crown molding, to complete the look.
Additional Tips
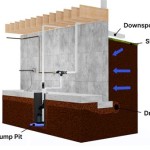
- Allow for a few inches of clearance between the sheathing and any plumbing pipes.
- Use a level to ensure that all walls and joists are plumb and level.
- Reinforce corners and any areas that will bear heavy loads with additional framing.
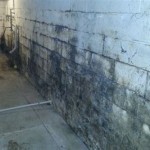
- If you encounter any moisture or structural issues, consult a professional before proceeding.
Framing an unfinished basement is a challenging but rewarding project. By following these steps and taking the necessary precautions, you can create a solid foundation for your finished basement, adding value and functionality to your home.

Basement Framing How To Frame Your Unfinished

Basement Framing How To Frame Your Unfinished

This Is How To Frame A Basement According Mike Holmes Hgtv

Insulating And Framing A Basement

Tips For Framing An Unfinished Basement Week 2 Of The One Room Challenge Willow Bloom Home

Tips For Framing Basement Walls Semigloss Design

Tips For Framing An Unfinished Basement Week 2 Of The One Room Challenge Willow Bloom Home

Tips For Framing Basement Walls Semigloss Design

How To Frame A Basement

Tips For Framing An Unfinished Basement Week 2 Of The One Room Challenge Willow Bloom Home
See Also