How to Install a Basement Sump Pump
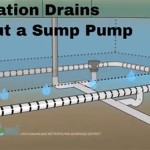
Are you experiencing water accumulation in your basement, leaving you worried every time it rains? A sump pump can be the solution. Sump pumps are vital in preventing flooding by removing excess groundwater from your basement. Installing one may seem daunting, but it can be a manageable project with proper planning and the right tools. Let's guide you through the essential steps.
Materials you'll need:
* Sump pump * Sump basin * Discharge pipe * PVC cement * Gravel (washed and pea-sized) * Basin liner (optional) * Check valve * Electrical wire and connectors * 120-volt GFCI outlet * Float switch * Safety glasses and glovesStep 1: Choose the Right Location
Select the lowest point in your basement, where water tends to accumulate. Mark the spot, making sure it's at least 2 feet away from any walls.
Step 2: Dig the Sump Basin Hole
Using a shovel or post-hole digger, excavate a hole approximately 18 inches deep and 12 inches wide, slightly wider than the sump basin you've chosen.
Step 3: Install the Sump Basin
Place the basin liner inside the hole (if using), ensuring it fits snugly. Then, carefully lower the sump basin into the hole, ensuring it's level and centered.
Step 4: Add Gravel to the Basin
Fill the space around the sump basin with washed pea-sized gravel, extending it to the top of the basin. This gravel will help filter water before it enters the pump.
Step 5: Connect the Discharge Pipe
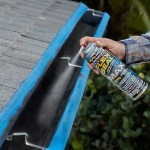
Connect one end of the discharge pipe to the outlet on the sump pump and secure it with PVC cement. Run the other end of the pipe through the hole in the basement wall, ensuring it slopes downward from the pump to prevent water from flowing back.
Step 6: Install the Check Valve
Install a check valve to prevent water from flowing back into the sump basin. Connect the check valve to the discharge pipe, just outside the basement wall.
Step 7: Connect the Electrical Wiring
Connect the electrical wire to the sump pump, ensuring it's a 120-volt GFCI outlet for safety. Make all electrical connections according to local codes and hire a licensed electrician if necessary.
Step 8: Install the Float Switch
Attach the float switch to the discharge pipe, just above the sump pump. This switch will automatically turn the pump on when the water level rises and turn it off when the water is pumped out.
Step 9: Test the Sump Pump
Manually activate the pump by lifting the float switch. Observe if the pump operates smoothly, lifting water from the basin and discharging it outside through the pipe.
Conclusion
Congratulations! You have successfully installed your basement sump pump. By following these steps carefully, you have created a reliable system to protect your basement from flooding. Remember, regular maintenance is vital for optimal performance. Regularly check the sump pump, ensure the discharge pipe is clear, and replace any damaged components promptly. A properly functioning sump pump will give you peace of mind knowing that your basement will remain dry.

What Is A Sump Pump Peel Pumps Explain It Or Sell And Install Them

Diy Sump Pump Install Your Own Smd Fluid Controls

Diy Sump Pump Install Your Own Smd Fluid Controls

Basement Sump Pump Sedona Waterproofing Solutions

Tips For Installing Sump Pumps 2024 10 17 Plumbing And Mechanical

How To Install A Sump Pump

Sump Pump Installs In Portland Bangor Rochester Maine Six Steps To Installing A System Me

Installing A Sump Pump In Our Basement Youtube

Sump Pump Installation In Pa De Dry Tech Waterproofing Solutions

Permanent Fixes For Damp Basements Diy