How to Install Carpet on a Basement Floor: A Comprehensive Guide
Installing carpet in a basement can transform a cold, utilitarian space into a warm, inviting area. However, due to the inherent moisture challenges associated with below-grade environments, proper preparation and installation techniques are crucial to ensure the longevity of the carpet and prevent mold or mildew growth. This article provides a thorough guide to installing carpet on a basement floor, covering essential steps from assessment to finishing touches.
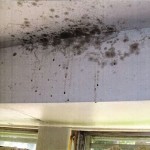
Before embarking on the installation process, a comprehensive evaluation of the basement's moisture levels is paramount. Basements are naturally prone to dampness due to their proximity to the ground. Conducting a simple moisture test can help determine the extent of any potential issues. One common method involves taping a square of plastic sheeting (approximately 2' x 2') to the concrete floor in several locations. Secure the plastic tightly with duct tape and leave it in place for 24-48 hours.
After the designated period, inspect the underside of the plastic. If moisture is present, it indicates that the basement floor is exhibiting signs of dampness. In such cases, addressing the moisture source is essential before proceeding with carpet installation. This may involve improving drainage around the foundation, sealing cracks in the walls or floor, or installing a dehumidifier to maintain a reasonable humidity level. Ignoring moisture issues can lead to significant problems down the line, including mold growth, carpet deterioration, and potential health concerns.
Once moisture concerns are addressed, the next step involves preparing the concrete floor for carpet installation. This entails cleaning the surface thoroughly to remove any dirt, debris, or existing adhesives. Begin by sweeping or vacuuming the entire floor to eliminate loose particles. For stubborn stains or adhesive residue, use a scraper or a specialized adhesive remover, following the manufacturer's instructions carefully. After removing any lingering residue, wash the floor with a mild detergent solution and allow it to dry completely. A clean, smooth surface is essential for proper carpet adhesion and a professional-looking finish.
It is highly recommended to use a subfloor system specifically designed for basements. These systems typically consist of interlocking tiles or panels made from moisture-resistant materials like plastic or foam. These subfloors serve as a barrier between the concrete and the carpet, helping to insulate the floor, reduce moisture migration, and provide a more comfortable walking surface.
Several types of subfloor options are available on the market, including those with built-in moisture barriers and air gaps to facilitate ventilation. When selecting a subfloor system, consider the specific moisture conditions in the basement and the desired level of insulation. Follow the manufacturer's instructions for installation, ensuring that the tiles or panels are properly aligned and interlocked. A properly installed subfloor is a critical investment in the long-term performance and longevity of the carpet.
Key Point 1: Moisture Mitigation is Paramount
The success of any basement carpet installation hinges on effective moisture management. Installing carpet over damp concrete can lead to a host of problems, including mold growth, musty odors, and carpet deterioration. Before proceeding with the installation, it is imperative to identify and address any sources of moisture. This may involve repairing cracks in the foundation, improving drainage around the perimeter of the house, or installing a dehumidifier to control humidity levels. Ignoring moisture issues is a recipe for disaster, potentially leading to costly repairs and health concerns down the road.
The selection of carpet and padding is also crucial in a basement environment. Opt for synthetic materials like nylon or olefin, which are less susceptible to moisture damage and mold growth than natural fibers like wool. A moisture-resistant carpet pad is equally important. These pads are designed to allow air to circulate beneath the carpet, preventing moisture from becoming trapped and promoting faster drying. Consider using a closed-cell foam pad, which is waterproof and resistant to mold and mildew. Avoid using jute or felt pads, as they tend to absorb moisture and can become breeding grounds for mold.
Once the subfloor is in place and the carpet and padding have been selected, the actual installation process can begin. Start by measuring the room accurately and calculating the amount of carpet needed. It is always advisable to order slightly more carpet than required to account for waste and pattern matching. Unroll the carpet in the room and allow it to acclimate to the temperature and humidity for at least 24 hours. This will help prevent shrinkage or expansion after installation. Use a utility knife or carpet cutter to trim the carpet to the correct size, leaving a few inches of excess around the perimeter.
Attach the tack strips around the perimeter of the room, positioning them approximately 1/4 inch from the wall. The tack strips will hold the carpet in place and create a smooth, even surface. Use a hammer and masonry nails to secure the tack strips to the concrete floor. Ensure that the tacks are facing towards the wall. Once the tack strips are installed, roll out the carpet padding and secure it to the subfloor using staples or carpet tape. Trim the padding to fit snugly against the tack strips.
With the tack strips and padding in place, the carpet can be stretched and secured. Use a power stretcher to stretch the carpet tightly across the room, ensuring that it is firmly engaged with the tack strips. Begin stretching the carpet from the center of the room and work outwards towards the walls. A properly stretched carpet will be taut and wrinkle-free. Once the carpet is stretched, use a knee kicker to secure it to the tack strips along the edges. Use a utility knife to trim the excess carpet along the walls, leaving a clean, professional edge.
Key Point 2: Subfloor Selection and Installation
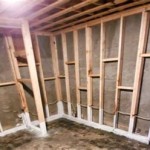
The selection and installation of a proper subfloor are essential for creating a comfortable and moisture-resistant foundation for the carpet. A suitable subfloor provides insulation, reduces moisture migration, and creates a more even surface for the carpet to adhere to. Several types of subfloor systems are available, including interlocking tiles, foam panels, and wood sleepers. When choosing a subfloor, consider the specific moisture conditions in the basement, the desired level of insulation, and the overall budget.
Interlocking subfloor tiles are a popular choice for basement applications due to their ease of installation and moisture resistance. These tiles typically consist of plastic or composite materials that are designed to snap together, creating a seamless and water-resistant surface. Foam panels are another option, offering excellent insulation and cushioning. Wood sleepers, while less common, can provide a more traditional feel but require careful selection of treated lumber to prevent rot and decay. Regardless of the chosen subfloor system, proper installation is crucial. Ensure that the subfloor is level, clean, and securely fastened to the concrete floor. A well-installed subfloor will contribute significantly to the longevity and performance of the carpet.
After the carpet is installed, the final step is to install baseboards or molding along the perimeter of the room. Baseboards not only provide a finished look but also help to protect the walls from damage. Choose baseboards that are compatible with the style of the room and secure them to the walls using nails or adhesive. Be sure to caulk the top edge of the baseboards to prevent moisture from seeping behind them.
Inspect the carpet carefully for any loose fibers or imperfections. Vacuum the carpet thoroughly to remove any debris or dust. For areas with heavy foot traffic, consider using a carpet protector to prevent staining and wear. Regular vacuuming and professional cleaning will help to maintain the appearance and longevity of the carpet. By following these steps, one can install carpet on a basement floor to create a warm, comfortable, and inviting space.
Key Point 3: Proper Carpet Stretching and Finishing
Achieving a professional-looking carpet installation requires proper stretching and finishing techniques. Stretching the carpet correctly ensures a taut, wrinkle-free surface that is less prone to wear and tear. Use a power stretcher to stretch the carpet tightly across the room, working from the center outwards. Secure the carpet to the tack strips along the edges using a knee kicker. Pay close attention to corners and doorways, ensuring that the carpet is properly trimmed and tucked.
Finishing touches, such as installing baseboards or molding, can significantly enhance the overall appearance of the room. Choose baseboards that complement the style of the room and secure them to the walls using nails or adhesive. Caulk the top edge of the baseboards to prevent moisture from seeping behind them. Inspect the carpet for any loose fibers or imperfections and trim them as needed. Vacuum the carpet thoroughly to remove any debris or dust. By paying attention to these details, one can transform a basement into a comfortable and stylish living space.

How To Carpet A Basement Floor Diy Family Handyman

The Best Basement Carpet For Do It Yourself Diy Installations

How To Install Carpet On Concrete

Basement Modular Carpet Tiles With A Raised Lock Together Base

How To Install Carpet On Concrete Basement With S

How To Install Carpet On Concrete In One Day

Installing Carpet On A Concrete Floor Youtube

How To Install Carpet On Concrete Basement With S

I Used Carpet Tiles All Over My Basement And It Looks Fabulous Youtube

Making Our Basement Home Office Cozier With Carpet Tiles Girl Loves Glam
See Also