How to Water Seal a Basement: A Comprehensive Guide
Waterproofing your basement is an essential task for any homeowner. It can protect your home from water damage, mold, and mildew and can also help you save money on your energy bills. However, waterproofing a basement can be a complex and time-consuming process, so hiring a professional is often the best option. If you decide to tackle the project yourself, follow these steps to ensure a successful outcome.
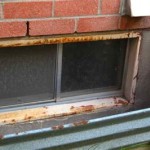
1. Inspect the Basement for Water Entry Points
The first step to waterproofing a basement is to inspect it for water entry points. Look for cracks in the foundation, walls, or floor. Also, check for areas where water is seeping in around pipes or windows. Once you have identified the water entry points, you can begin to seal them.
2. Seal Cracks and Joints
To seal cracks and joints, you can use hydraulic cement or a polyurethane-based sealant. Hydraulic cement is a quick-setting material that can be applied to cracks and joints to stop water infiltration. Polyurethane-based sealants are slower setting but are more flexible and can withstand movement. To apply either type of sealant, clean the crack or joint and then apply the sealant according to the manufacturer's instructions.
3. Install a Sump Pump
A sump pump is a device that pumps water out of a basement. If your basement is prone to flooding, installing a sump pump is a good way to prevent water damage. Sump pumps are available in a variety of sizes and capacities, so you can choose one that is right for your needs. To install a sump pump, dig a hole in the floor of your basement and place the pump in the hole. Then, connect the pump to a discharge pipe that will carry the water away from your home.
4. Install a French Drain
A French drain is a trench that is filled with gravel or crushed stone. French drains are installed around the perimeter of a basement to collect water and drain it away from the foundation. To install a French drain, dig a trench around the perimeter of your basement. Then, line the trench with gravel or crushed stone. Finally, cover the trench with soil.
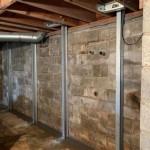
5. Waterproof the Walls
If your basement walls are damp or wet, you can waterproof them by applying a waterproofing membrane. Waterproofing membranes are available in a variety of materials, including asphalt, rubber, and plastic. To apply a waterproofing membrane, clean the walls and then apply the membrane according to the manufacturer's instructions.
6. Finish the Basement
Once you have waterproofed your basement, you can finish it to your liking. There are a variety of ways to finish a basement, including adding drywall, paint, and flooring. You can also add furniture and other items to make your basement a comfortable and inviting space.
Conclusion
Waterproofing your basement is an important home improvement project that can protect your home from water damage, mold, and mildew. By following these steps, you can successfully waterproof your basement and enjoy a dry and comfortable space.

Diy Basement Waterproofing By Triad

The 3 Major Approaches To Basement Waterproofing News And Events For Systems Inc

How To Waterproof Your Basement True Value

Diy Basement Waterproofing Sealonce System Easy Installation Waterproof Com

Waterproofing A Basement From The Inside Can Be Challenge Fine Homebuilding

Waterproofing Your Home Mid Construction Ohio Basement Authority

Interior Basement Waterproofing In Pa De Dry Tech Solutions

Waterproofing Basement Floor Slabs And Walls Waterproof Magazine

How To Waterproof Basement Walls From Inside Sani Tred

How Does Interior Basement Waterproofing Work
See Also