Snaking a Basement Floor Drain: A Comprehensive Guide for Homeowners
A clogged basement floor drain can lead to a range of unwelcome issues, including water damage and unpleasant odors. Snaking the drain, a simple but effective technique, can often resolve the issue and restore proper drainage. This comprehensive guide will walk you through the essential steps involved in snaking a basement floor drain, empowering you to tackle this task with confidence.
Understanding the Proper Tools
Before you begin, it's crucial to gather the necessary tools. These include a drain snake, a pair of gloves, a bucket or bowl, and a flashlight. Drain snakes come in various lengths and materials; choose one that suits the size of your drain and is durable enough to handle the clog.
Preparing the Drain
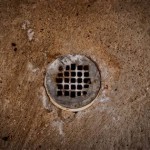
Start by removing any visible debris, such as hair, soap scum, or small objects, from the drain. This helps to clear a path for the drain snake and improves its effectiveness. Use a pair of pliers or a small hook to remove any significant obstructions.
Inserting the Drain Snake
Wear a pair of gloves to protect your hands during this stage. Insert the front end of the drain snake into the drain opening. Slowly feed the snake into the drain, rotating it clockwise as you go. Continue inserting the snake until you feel resistance, indicating that you've reached the clog.
Breaking Up the Clog
Once you've reached the clog, apply gentle pressure and continue rotating the drain snake. The snake's corkscrew-like design will loosen and break up the obstruction. If you encounter significant resistance, avoid applying excessive force that could damage the drain. Instead, retract the snake slightly and try again.
Removing the Debris
As you break up the clog, it will start to dislodge and come out of the drain. Use a bucket or bowl to collect the debris, preventing it from flowing back into the drain. Continue snaking and removing the debris until the flow of water improves.
Flushing the Drain
Once you've removed the majority of the clog, it's time to flush the drain with hot water. This helps to wash away any remaining debris and ensure that the drain is flowing properly. Run hot water for several minutes, checking the flow regularly.
Preventing Future Clogs
To prevent future clogs, consider installing a drain strainer to catch hair and other small objects before they enter the drain. Regularly cleaning the drain using enzymatic drain cleaners can also help to break down organic matter and prevent buildup. Avoid pouring grease or food particles down the drain, as these can contribute to clogs.
Conclusion
Snaking a basement floor drain is a relatively simple task that can effectively resolve clogs and restore proper drainage. By following the steps outlined in this guide, you can confidently tackle this issue and maintain a clean and functional drain in your basement.

How To Unclog A Pipes Using Drain Auger Diy Family Handyman

How To Unclog A Pipes Using Drain Auger Diy Family Handyman

How To Unclog A Pipes Using Drain Auger Diy Family Handyman

How To Clear A Clogged Floor Drain In Denver

How Do You Unclog A Basement Floor Drain Atlanta Ga Plumbers

How To Unclog A Pipes Using Drain Auger Diy Family Handyman

How To Unclog Basement A Floor Drain Complete Diy Guide 5 Star Plumbing

Why Does My Floor Drain Back Up Structure Tech Home Inspections

How To Unclog A Pipes Using Drain Auger Diy Family Handyman

How To Snake A Basement Floor Drain Yourself
See Also